This PC-Rail Diagnostics program can help in providing us with the information needed to diagnose and put right any program faults which may occur. It simplifies the copying of diagnostic ('.med') data files and enables them to easiliy be attached to an email. It can also be used to send us 'saved positions', which in most cases are of great assistance in recreating and solving problems.
We normally request these files after a user has found
a problem with a particular simulation which has generated a 'VFP' or PC-Rail error message or a certain move has caused problems. These files will help us identify the error and where necessary to produce an updated version.
Running The Program.
Whilst running the simulation, use the menu option Help/Diagnostics.
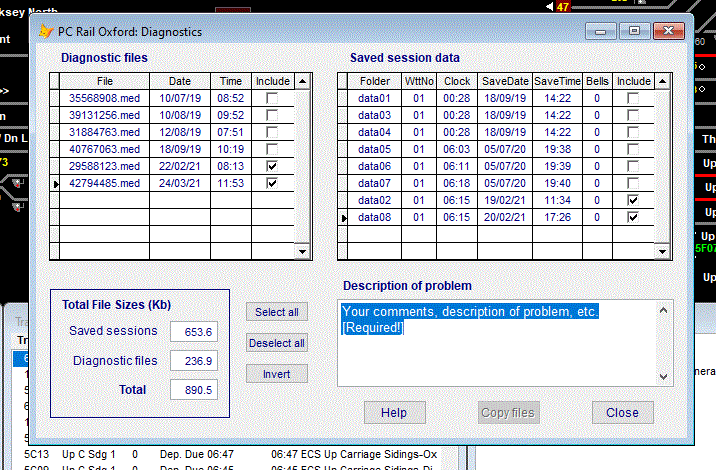
The Diagnostic screen will be opened:
The main screen is split into four main parts.
The left section below lists any diagnostic files which have been produced by the program when an error is found. This will create a .med file like the one listed as 42794485.med dated 24/03/21 at 11:53 hours. Next to this there is a checkbox - click on this to select or deselect that file from inclusion in the diagnostics you send, though there is no harm in sending them all.
To the right are details of the available Saved Session data. The data is saved into numbered data folders, i.e, data01, data 02, etc. In the above example 8 saved sessions are listed, with details of the number of the timetable used, clock time, saved date, saved time. This will help you identify the exact folder required. Ideally we would need a saved session just before the problem occurred and one immediately afterwards. You should uncheck any sessions which are not relevant
to the problem concerned.
Enter details in the 'Description of problem' box [this is required].
Example.
In the above screen 2 diagnostic files and 2 saved positions have been selected. When you have entered the 'Description of problem', the 'Copy Files' button will be enabled.
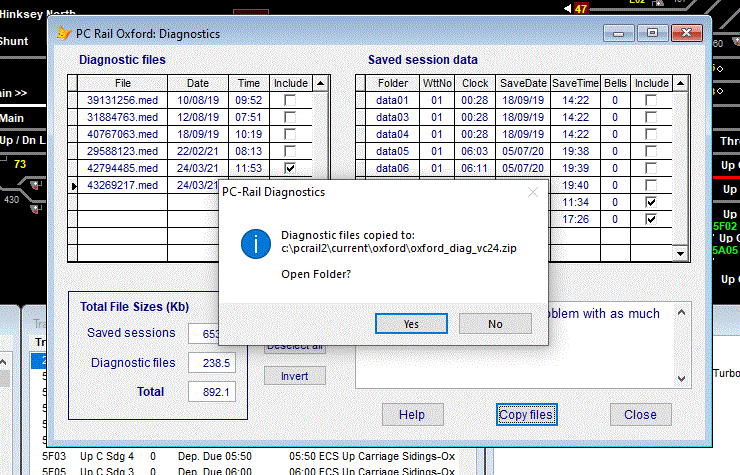
Click on 'Copy Files' and the program will capture the required files and inform you where the file(s) have been saved to.- the following screen will be shown:
If you choose to 'Open Folder', you can then select the diagnostic zip file which has been created:
In the example shown the file name is 'Oxford_Diag_VC24.zip'.
We will deal with it as soon as possible and reply (usually within 1-3 days) as soon as we have found the cause or we may need to ask you for further information.